Introduction
A flashlight is an essential tool that everyone should have in their household. It provides a portable source of light that can be used in various situations, such as power outages, outdoor activities, or emergencies. While you can easily purchase a flashlight from a store, building your own Flashlight Circuit can be a fun and educational project. In this article, we will guide you through the process of creating a DIY flashlight circuit.
Understanding the Basics of a Flashlight Circuit
Components of a Flashlight Circuit
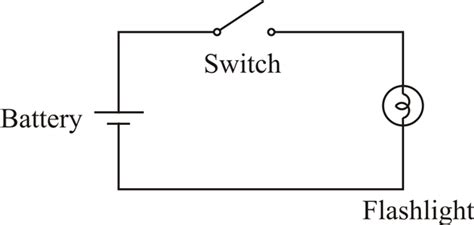
A basic flashlight circuit consists of the following components:
- Power source (battery)
- Switch
- Resistor (optional)
- LED (Light Emitting Diode)
How a Flashlight Circuit Works
When the switch is closed (turned on), it completes the circuit, allowing electricity to flow from the battery through the LED and back to the battery. The resistor, if present, helps to regulate the current flow and protect the LED from burning out due to excessive current.

Gathering the Materials
Before you start building your flashlight circuit, you’ll need to gather the following materials:
- 9V battery
- 9V battery connector
- Toggle switch
- 220Ω resistor
- 5mm LED
- Insulated wire
- Soldering iron and solder
- Wire cutters/strippers
- Breadboard (optional, for testing)

Step-by-Step Guide to Building a Flashlight Circuit
Step 1: Test the Circuit (Optional)
If you’re new to electronics, it’s a good idea to test your circuit on a breadboard before soldering the components together. This will help you ensure that the circuit works as expected and familiarize you with the components.
- Place the 9V battery connector on the breadboard.
- Connect the positive terminal of the battery connector to one end of the switch.
- Connect the other end of the switch to one end of the resistor.
- Connect the other end of the resistor to the positive (longer) leg of the LED.
- Connect the negative (shorter) leg of the LED to the negative terminal of the battery connector.
- Insert the 9V battery into the connector and turn on the switch. The LED should light up.
Step 2: Solder the Components
Once you’ve confirmed that the circuit works, you can solder the components together for a more permanent solution.
- Cut two pieces of insulated wire, each about 6 inches long.
- Strip about 1/2 inch of insulation from each end of both wires.
- Solder one end of the first wire to one of the switch terminals.
- Solder the other end of the first wire to one end of the resistor.
- Solder one end of the second wire to the positive (longer) leg of the LED.
- Solder the other end of the resistor to the positive leg of the LED.
- Solder the negative (shorter) leg of the LED to the negative terminal of the 9V battery connector.
- Solder the remaining switch terminal to the positive terminal of the 9V battery connector.
Step 3: Test the Soldered Circuit
Insert the 9V battery into the connector and turn on the switch. The LED should light up, indicating that your flashlight circuit is working correctly.

Enhancing Your Flashlight Circuit
Now that you’ve built a basic flashlight circuit, you can explore various ways to enhance its functionality and design.
Adding a Reflector
To increase the efficiency and directionality of your flashlight, you can add a reflector around the LED. A reflector helps to concentrate the light emitted by the LED, making the flashlight appear brighter and more focused.
You can create a simple reflector using a small piece of aluminum foil or a pre-made reflector cup designed for LEDs. Place the reflector around the LED, ensuring that it doesn’t short-circuit any of the connections.
Using Multiple LEDs
If you want a brighter flashlight, you can use multiple LEDs in your circuit. To do this, you’ll need to connect the LEDs in parallel, ensuring that their positive and negative legs are connected to the appropriate points in the circuit.
Keep in mind that adding more LEDs will increase the current draw on the battery, which may reduce the flashlight’s runtime. You can compensate for this by using a higher-capacity battery or adding a Current-Limiting Resistor for each LED.
Implementing a Dimmer Switch
A dimmer switch allows you to adjust the brightness of your flashlight, conserving battery life when full brightness isn’t necessary. To add a dimmer switch, you’ll need to replace the toggle switch with a potentiometer.
A potentiometer is a variable resistor that can be adjusted by turning a knob or slider. By connecting the potentiometer in series with the LED, you can control the amount of current flowing through the LED, thus adjusting its brightness.
Building a Flashlight Housing
To make your flashlight more durable and practical, you can build a housing for the circuit. A housing protects the components from damage and makes the flashlight easier to handle.
You can create a simple housing using PVC pipe, a plastic container, or even 3D-print a custom design. Be sure to include openings for the switch and LED, as well as a way to access the battery for replacement.
Troubleshooting Common Issues
If your flashlight circuit isn’t working as expected, here are some common issues and their solutions:
-
LED doesn’t light up: Check that the battery is properly connected and has sufficient charge. Ensure that the LED is connected correctly (positive leg to resistor, negative leg to battery negative). Verify that the switch is functioning properly.
-
LED is dim: Ensure that the resistor value is correct for the LED and battery voltage. Check for any loose connections or damaged components.
-
Short battery life: Verify that the LED and resistor are rated for the battery voltage. Consider using a higher-capacity battery or reducing the number of LEDs in the circuit.
Frequently Asked Questions (FAQ)
-
Can I use a different battery voltage?
Yes, you can use a different battery voltage, but you’ll need to adjust the resistor value accordingly to ensure that the LED receives the appropriate current. Use Ohm’s Law (V = IR) to calculate the required resistor value. -
Can I use a different color LED?
Yes, you can use any color LED in your flashlight circuit. Just make sure that the LED is rated for the same voltage and current as the one used in this guide. -
How long will the battery last?
The battery life depends on the capacity of the battery and the current draw of the LED. A standard 9V battery has a capacity of around 500mAh, which should provide several hours of continuous use with a single LED. -
Can I make the flashlight waterproof?
Yes, you can make the flashlight waterproof by using a suitable housing material and properly sealing any openings. However, ensure that the housing allows for battery replacement and adequate heat dissipation. -
Is it safe to build a flashlight circuit at home?
Building a simple flashlight circuit is generally safe, as it uses a low voltage and current. However, always exercise caution when working with electricity and soldering tools. Supervise children and ensure proper safety measures are followed.
Conclusion
Building your own flashlight circuit is a rewarding and educational experience that can help you understand the basics of electrical circuits. By following this step-by-step guide, you can create a functional flashlight that you can customize to your needs. As you gain more experience, you can explore additional enhancements and modifications to improve your flashlight’s performance and design.
Remember to always prioritize safety when working with electrical components and tools. With proper care and attention to detail, your DIY flashlight circuit will provide you with a reliable source of light for years to come.


Leave a Reply