What is Solder Mask and Why is it Important?
Solder mask, also known as solder resist or solder stop mask, is a thin layer of polymer applied to the copper traces of a printed circuit board (PCB). Its primary purpose is to protect the copper traces from oxidation, prevent solder bridges from forming between closely spaced pads, and provide electrical insulation. Solder mask also helps to improve the overall aesthetics of the PCB by providing a uniform color, typically green or blue.
The solder mask layer is crucial for several reasons:
-
Protection against oxidation: Copper traces on a PCB can easily oxidize when exposed to air, leading to reduced conductivity and potential circuit failures. The solder mask layer acts as a barrier, preventing oxidation and ensuring the long-term reliability of the PCB.
-
Prevention of solder bridges: During the soldering process, molten solder can sometimes flow between adjacent pads or traces, creating unintended connections known as solder bridges. These bridges can cause short circuits and lead to malfunctions. The solder mask layer helps to prevent this by providing a non-wettable surface that repels molten solder.
-
Electrical insulation: The solder mask layer provides electrical insulation between the copper traces, preventing unwanted current flow and reducing the risk of short circuits.
-
Improved aesthetics: Solder mask gives the PCB a uniform color, making it more visually appealing and easier to inspect for defects.
Types of Solder Mask Damage
Despite its protective properties, the solder mask layer can sometimes become damaged due to various factors such as:
-
Mechanical damage: Scratches, abrasions, or impacts can cause the solder mask to chip or peel away from the PCB surface.
-
Chemical damage: Exposure to harsh chemicals or solvents can degrade the solder mask layer, causing it to become brittle or dissolve.
-
Thermal damage: Excessive heat during soldering or rework can cause the solder mask to blister, bubble, or lift away from the PCB surface.
-
Manufacturing defects: Inadequate application of the solder mask during the manufacturing process can result in thin or uneven coverage, leading to areas of exposed copper.
When the solder mask layer becomes damaged, it can compromise the protection and insulation it provides, potentially leading to circuit failures or reduced PCB lifespan. Therefore, it is essential to repair damaged solder mask to restore the PCB’s integrity and ensure its proper functioning.
Methods for Repairing Solder Mask
There are several methods for repairing damaged solder mask on a PCB, each with its own advantages and limitations. The choice of method depends on the extent of the damage, the available tools and materials, and the required level of precision. Below, we will discuss some of the most common methods for solder mask repair.
1. Solder Mask Patch
One of the simplest and most straightforward methods for repairing small areas of damaged solder mask is to use a solder mask patch. These patches are typically made of a thin, self-adhesive film that closely matches the color and properties of the original solder mask.
To apply a solder mask patch:
- Clean the damaged area thoroughly with isopropyl alcohol to remove any dirt, debris, or oxidation.
- Cut a piece of the solder mask patch slightly larger than the damaged area.
- Carefully align the patch over the damaged area and press it down firmly to ensure good adhesion.
- Use a sharp knife or scalpel to trim any excess patch material, ensuring a neat and precise repair.
Advantages of using a solder mask patch:
- Quick and easy to apply
- Requires minimal tools and materials
- Provides a good color match to the original solder mask
- Suitable for small, localized repairs
Limitations of using a solder mask patch:
- Not suitable for large or extensive damage
- May not provide the same level of durability as the original solder mask
- Can be difficult to achieve a seamless repair on complex PCB layouts
2. Liquid Solder Mask
Another option for repairing damaged solder mask is to use a liquid solder mask. This method involves applying a liquid polymer directly to the damaged area, which then cures to form a new protective layer.
To Repair Solder Mask using liquid solder mask:
- Clean the damaged area thoroughly with isopropyl alcohol to remove any dirt, debris, or oxidation.
- Apply a thin, even layer of liquid solder mask over the damaged area using a fine-tipped brush or applicator.
- Allow the liquid solder mask to cure according to the manufacturer’s instructions. This may involve exposure to UV light or heat, depending on the specific product used.
- Once cured, inspect the repair for any imperfections or air bubbles. If necessary, apply additional layers of liquid solder mask to achieve a smooth, even finish.
Advantages of using liquid solder mask:
- Provides a more durable and long-lasting repair compared to solder mask patches
- Can be used to repair larger areas of damage
- Allows for a more precise and customizable repair
- Can be tinted to match the color of the original solder mask
Limitations of using liquid solder mask:
- Requires more time and skill to apply compared to solder mask patches
- May require specialized tools or equipment, such as UV curing lamps
- Can be messy to work with and may require practice to achieve a neat, even finish
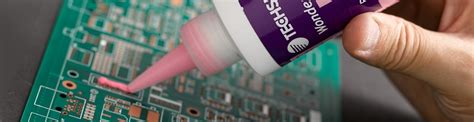
3. Solder Mask Pen
For very small or intricate repairs, a solder mask pen can be a useful tool. These pens contain a quick-drying, pigmented solder mask solution that can be precisely applied to the damaged area.
To use a solder mask pen:
- Clean the damaged area thoroughly with isopropyl alcohol to remove any dirt, debris, or oxidation.
- Carefully apply the solder mask solution from the pen to the damaged area, using slow, steady strokes to ensure even coverage.
- Allow the solution to dry according to the manufacturer’s instructions. Most solder mask pens contain quick-drying formulas that cure within minutes.
- Inspect the repair for any missed spots or uneven areas. If necessary, apply additional coats of the solder mask solution until a satisfactory repair is achieved.
Advantages of using a solder mask pen:
- Allows for very precise and targeted repairs
- Quick and easy to use
- Ideal for small, intricate PCB layouts
- Minimal cleanup required
Limitations of using a solder mask pen:
- Not suitable for large or extensive damage
- May not provide the same level of durability as other repair methods
- Limited color options may not match the original solder mask perfectly
4. Professional Repair Services
For extensive damage or high-value PCBs, it may be preferable to seek the services of a professional PCB repair company. These companies specialize in repairing and refurbishing PCBs, including solder mask repair, and have access to advanced tools, materials, and techniques.
Professional repair services can offer several advantages:
- Expertise in handling complex or delicate repairs
- Access to specialized equipment and high-quality materials
- Ability to closely match the original solder mask properties and appearance
- Thorough testing and quality control to ensure a reliable repair
However, professional repair services can also be more expensive and time-consuming compared to DIY methods, and may not be cost-effective for low-value or easily replaceable PCBs.

Preventing Solder Mask Damage
While it is important to know how to repair damaged solder mask, it is equally essential to take steps to prevent damage from occurring in the first place. Here are some tips for maintaining the integrity of your PCB’s solder mask layer:
-
Handle PCBs with care: Always handle PCBs by their edges to minimize the risk of scratches, abrasions, or other mechanical damage to the solder mask.
-
Use appropriate storage and packaging: Store PCBs in clean, dry environments and use anti-static packaging materials to protect them from damage during transport.
-
Avoid exposure to harsh chemicals: Keep PCBs away from harsh chemicals, solvents, and other substances that can degrade the solder mask layer.
-
Follow proper soldering techniques: Use appropriate soldering temperatures and techniques to minimize the risk of thermal damage to the solder mask.
-
Inspect PCBs regularly: Periodically inspect your PCBs for signs of solder mask damage, such as cracks, chips, or discoloration. Catching and repairing damage early can prevent more serious issues from developing.
By following these preventive measures and addressing any solder mask damage promptly, you can help to ensure the long-term reliability and performance of your PCBs.

Frequently Asked Questions
1. Can I use nail polish to repair solder mask?
While some people may suggest using nail polish as a quick fix for damaged solder mask, it is not recommended. Nail polish is not designed for use on PCBs and may not provide the same level of protection, durability, or insulation as purpose-made solder mask repair products.
2. How do I choose the right color for solder mask repair?
When selecting a solder mask repair product, try to choose a color that closely matches the original solder mask on your PCB. Most manufacturers offer a range of color options, including green, blue, red, and black. If an exact match is not available, choose a color that provides sufficient contrast against the PCB substrate for easy inspection.
3. Can I use a solder mask repair product on a PCB that will be subjected to high temperatures?
The suitability of a solder mask repair product for high-temperature applications depends on the specific product and its temperature rating. Some products are designed to withstand higher temperatures than others. Always check the manufacturer’s specifications and recommendations before using a repair product on a PCB that will be exposed to high temperatures.
4. How long does a solder mask repair typically last?
The longevity of a solder mask repair depends on various factors, including the repair method used, the quality of the materials, and the operating environment of the PCB. In general, a well-executed repair using high-quality materials can last for several years, provided the PCB is not subjected to excessive mechanical, chemical, or thermal stress.
5. Can I apply a new layer of solder mask over an existing layer?
In most cases, it is not recommended to apply a new layer of solder mask directly over an existing layer. This can lead to poor adhesion, uneven coverage, and reduced protection. If the existing solder mask layer is damaged or degraded, it is best to remove it completely before applying a new layer. This can be done using solder mask strippers or by carefully sanding the surface until the underlying copper is exposed.
| Method | Advantages | Limitations |
|---|---|---|
| Solder Mask Patch | – Quick and easy to apply – Requires minimal tools and materials – Provides a good color match to the original solder mask – Suitable for small, localized repairs |
– Not suitable for large or extensive damage – May not provide the same level of durability as the original solder mask – Can be difficult to achieve a seamless repair on complex PCB layouts |
| Liquid Solder Mask | – Provides a more durable and long-lasting repair compared to solder mask patches – Can be used to repair larger areas of damage – Allows for a more precise and customizable repair – Can be tinted to match the color of the original solder mask |
– Requires more time and skill to apply compared to solder mask patches – May require specialized tools or equipment, such as UV curing lamps – Can be messy to work with and may require practice to achieve a neat, even finish |
| Solder Mask Pen | – Allows for very precise and targeted repairs – Quick and easy to use – Ideal for small, intricate PCB layouts – Minimal cleanup required |
– Not suitable for large or extensive damage – May not provide the same level of durability as other repair methods – Limited color options may not match the original solder mask perfectly |
| Professional Repair Services | – Expertise in handling complex or delicate repairs – Access to specialized equipment and high-quality materials – Ability to closely match the original solder mask properties and appearance – Thorough testing and quality control to ensure a reliable repair |
– More expensive and time-consuming compared to DIY methods – May not be cost-effective for low-value or easily replaceable PCBs |
In conclusion, repairing the solder mask on a PCB is an important skill for anyone working with electronic circuits. By understanding the various repair methods available and their advantages and limitations, you can choose the best approach for your specific situation. Whether you opt for a simple solder mask patch, a more advanced liquid solder mask, or seek the assistance of professional repair services, taking prompt action to address solder mask damage can help to ensure the long-term reliability and performance of your PCBs.


Leave a Reply