Introduction to the PiGRRL Pack
The Raspberry Pi has revolutionized the world of DIY electronics, offering a powerful and affordable platform for hobbyists, educators, and professionals alike. One of the most exciting applications of the Raspberry Pi is in the realm of retro gaming, where enthusiasts can create their own portable gaming consoles using the PiGRRL Pack.
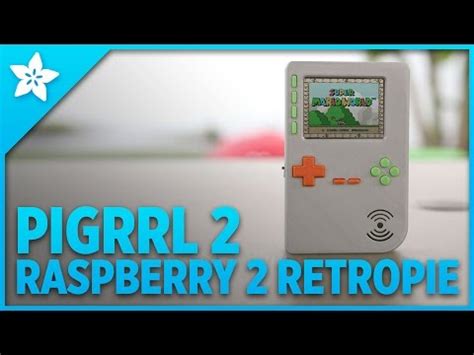
The PiGRRL Pack is a complete kit that includes everything you need to build your own portable gaming console based on the Raspberry Pi 2. The pack includes a custom PCB, buttons, a screen, and all the necessary components to assemble your own handheld gaming device.
What’s Included in the PiGRRL Pack?
| Component | Description |
|---|---|
| Raspberry Pi 2 | The heart of the PiGRRL, a powerful single-board computer |
| Custom Gamepad PCB | A specially designed PCB that integrates the buttons and controls |
| 2.8″ PiTFT Screen | A vibrant, high-resolution screen for displaying your games |
| Buttons and Controls | A set of high-quality buttons and a joystick for precise control |
| Battery and Charger | A rechargeable battery and charger to keep your PiGRRL powered on the go |
| 3D Printed Case | A durable, custom-designed case to house and protect your components |
Setting Up Your PiGRRL
Installing the Operating System
The first step in setting up your PiGRRL is to install the operating system on your Raspberry Pi 2. The most popular choice for retro gaming is RetroPie, a specialized distribution that includes a wide range of emulators and a user-friendly interface.
To install RetroPie on your Raspberry Pi 2, follow these steps:
- Download the latest version of RetroPie from the official website
- Write the RetroPie image to a microSD card using a tool like Etcher
- Insert the microSD card into your Raspberry Pi 2
- Connect your Raspberry Pi 2 to a power source and wait for the installation to complete
Configuring Your PiGRRL
Once you have RetroPie installed on your Raspberry Pi 2, it’s time to configure your PiGRRL. This involves setting up your controls, configuring your emulators, and customizing your gaming experience.
Setting Up Your Controls
The PiGRRL Pack includes a custom gamepad PCB that connects to your Raspberry Pi 2 via GPIO pins. To set up your controls, follow these steps:
- Connect the gamepad PCB to your Raspberry Pi 2 using the provided ribbon cable
- Boot up your PiGRRL and navigate to the RetroPie configuration menu
- Select “Configure Input” and follow the on-screen prompts to map your buttons and joystick
Configuring Your Emulators
RetroPie includes a wide range of emulators for various gaming systems, from classic consoles like the NES and SNES to arcade machines and handheld devices. To configure your emulators, follow these steps:
- Navigate to the RetroPie configuration menu
- Select “Emulator Settings” and choose the emulator you want to configure
- Adjust settings like video scaling, audio output, and controller mappings to your liking

Playing Games on Your PiGRRL
Adding ROMs to Your PiGRRL
To play games on your PiGRRL, you’ll need to add ROMs (game files) to your Raspberry Pi 2. There are several ways to do this, but the easiest is to use a USB drive.
- Create a folder called “retropie” on your USB drive
- Inside the “retropie” folder, create subfolders for each gaming system you want to add ROMs for (e.g., “nes”, “snes”, “arcade”)
- Copy your ROMs into the appropriate subfolders
- Insert the USB drive into your Raspberry Pi 2 and wait for RetroPie to automatically detect and copy the ROMs
Launching and Playing Games
Once you have your ROMs added to your PiGRRL, launching and playing games is a breeze.
- Navigate to the RetroPie main menu using your joystick or d-pad
- Select the gaming system you want to play
- Choose the game you want to launch from the list of available ROMs
- Use your buttons and joystick to play the game just like you would on the original console

Customizing Your PiGRRL
3D Printing a Custom Case
The PiGRRL Pack includes a 3D printed case to house and protect your components, but you can also design and print your own custom case. There are many 3D models available online, or you can create your own using CAD software.
Overclocking Your Raspberry Pi 2
If you want to squeeze extra performance out of your PiGRRL, you can overclock your Raspberry Pi 2. Overclocking involves increasing the clock speed of the CPU and GPU, which can lead to faster emulation and smoother gameplay.
To overclock your Raspberry Pi 2, follow these steps:
- Open the Raspberry Pi configuration tool by typing
sudo raspi-configin the terminal - Select “Overclock” and choose your desired overclock setting
- Reboot your Raspberry Pi 2 for the changes to take effect
Note: Overclocking can potentially damage your Raspberry Pi 2 if done improperly. Be sure to research safe overclock settings and monitor your system temperatures closely.

Troubleshooting Common Issues
My PiGRRL Won’t Boot
If your PiGRRL won’t boot, there are a few things you can try:
- Make sure your microSD card is properly inserted and seated
- Check that your power supply is providing enough current (at least 2.5A)
- Try a different microSD card or re-image your current card with RetroPie
My Controls Aren’t Working
If your buttons or joystick aren’t working, try the following:
- Make sure your gamepad PCB is properly connected to your Raspberry Pi 2
- Re-configure your controls through the RetroPie menu
- Check for any loose or broken connections on your gamepad PCB
My Games Are Running Slowly
If your games are running slowly or with poor performance, try these tips:
- Overclock your Raspberry Pi 2 (see above)
- Adjust emulator settings like video scaling and audio output
- Make sure your ROMs are compatible with the emulator you’re using
Frequently Asked Questions
Can I use a different Raspberry Pi model with the PiGRRL Pack?
While the PiGRRL Pack is designed specifically for the Raspberry Pi 2, you can use a different model like the Raspberry Pi 3 or 4. However, you may need to make adjustments to the case and other components to ensure compatibility.
Can I use the PiGRRL Pack with other operating systems besides RetroPie?
Yes, you can use the PiGRRL Pack with other operating systems like Lakka or Batocera. However, RetroPie is the most popular choice for retro gaming on the Raspberry Pi due to its ease of use and wide range of supported emulators.
How long does the battery last on the PiGRRL?
The battery life of the PiGRRL depends on various factors like screen brightness, emulator settings, and the games you’re playing. On average, you can expect around 2-3 hours of playtime on a single charge.
Can I add more buttons or controls to the PiGRRL?
Yes, you can add more buttons or controls to the PiGRRL by modifying the gamepad PCB or using additional input devices like a USB controller. However, this may require more advanced hardware and software modifications.
Where can I find ROMs for the PiGRRL?
ROMs are copyrighted material, and downloading them without permission is illegal in most cases. We recommend using ROMs that you have created yourself from games you own, or using legal alternatives like homebrew games or open-source ROMs.
Conclusion
The Raspberry Pi 2 PiGRRL Pack is an excellent way to experience the joys of retro gaming in a portable, customizable form factor. With its powerful hardware, versatile software, and endless customization options, the PiGRRL is a must-have for any retro gaming enthusiast.
Whether you’re a seasoned DIY electronics hobbyist or a newcomer to the world of Raspberry Pi, the PiGRRL Pack offers a fun and rewarding project that will provide hours of entertainment and nostalgia. So why wait? Grab your PiGRRL Pack today and start building your very own portable gaming console!


Leave a Reply