What is Solder Wicking?
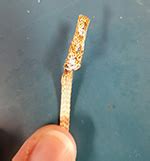
Solder wicking, also known as capillary action or the “solder wick effect”, is a common issue that occurs when soldering electronic components and connectors. It happens when molten solder flows or “wicks” up the leads or pins of a component, traveling beyond the intended solder joint area.
Solder wicking is caused by capillary action – the ability of a liquid (in this case molten solder) to flow in narrow spaces without the assistance of, or even in opposition to, external forces like gravity. The molten solder is drawn up the surface of the component lead due to the adhesive and cohesive forces between the solder and the metal surface.
While a small amount of solder wicking is normal and generally not a problem, excessive wicking can cause issues. If solder wicks too far up a connector lead or component pin, it can create unwanted solder bridges, impede insertion of the connector into a socket or header, or cause mechanical stress on the component.
Why Does Solder Wick Up Leads?
There are several factors that contribute to the capillary action that causes solder to wick up component leads:
Surface Tension and Adhesive Forces
Molten solder has a high surface tension which causes it to adhere strongly to metal surfaces. The adhesive force between the solder and the component lead pulls the molten solder upwards.
Narrow Spaces
Capillary action is more pronounced in narrow spaces. The small gaps between connector leads or component pins facilitate solder wicking.
Temperature
Solder wicks more readily when it is heated to higher temperatures. If the soldering iron temperature is too high, it can exacerbate solder wicking.
Soldering Time
Holding the soldering iron on the joint for too long gives the solder more time to travel up the lead. Excessive soldering time increases the likelihood and extent of solder wicking.
Lead Surface
Solder wicks more easily on surfaces it can adhere to. Contaminants like dirt, grease or oxidation on component leads can impede wicking. Conversely, smooth clean metal surfaces facilitate solder wicking.

Connectors Prone to Solder Wicking
Some types of connectors and components are more susceptible to problematic solder wicking due to their design and pin spacing. Connectors with closely spaced pins and long exposed leads are at higher risk.
Examples of connectors where solder wicking is commonly an issue include:
| Connector Type | Pitch (pin spacing) | Wicking Susceptibility |
|---|---|---|
| D-Sub | 2.54mm | Moderate |
| Headers | 2.54mm, 2.00mm | Moderate to High |
| FFC/FPC | 1.00mm, 0.50mm | High |
| Edge Card | varies | Moderate to High |
Fine pitch connectors with lead spacing of 1mm or less are especially prone to wicking. The close pin spacing leaves little room for solder and encourages capillary action.

Preventing Excessive Solder Wicking
There are several techniques that can be used to minimize problematic solder wicking on connector leads:
Use an Appropriate Soldering Iron Tip
Use a soldering iron tip that concentrates heat at the end and matches the size of the solder joint. A tip that is too large will heat more of the lead and promote wicking. Elongated or conical tips work well for precision soldering of connector pins.
Set the Right Soldering Temperature
Use the lowest soldering iron temperature that will still melt the solder efficiently. Higher temperatures thin the solder, reducing its viscosity and encouraging wicking. Typical recommended soldering temperatures are in the 600-700°F (315-370°C) range for lead-based solder and 650-750°F (345-400°C) for lead-free solder.
Control Soldering Time
Apply heat to the joint only long enough to melt the solder and create a good connection. Avoid holding the iron on the pin longer than needed. Aim for a soldering time of 1-2 seconds per pin.
Apply the Right Amount of Solder
Apply only as much solder as needed to create a proper joint. Avoid applying excessive solder that can more readily wick up the lead. The solder joint should look like a concave fillet, not a convex bulge.
Keep Leads Clean
Ensure component leads/pins are clean and free of contaminants or oxidation before soldering. Dirty or oxidized leads impede solder flow and take longer to solder, allowing more time for wicking to occur. If needed, clean leads prior to soldering with isopropyl alcohol or a mildly abrasive cleaning pad.
Use Flux Judiciously
While flux is necessary for proper soldering, using too much can thin solder and promote excessive wicking. Apply flux sparingly and avoid letting it wick far up the leads before soldering. Use no-clean flux to avoid the need for post-soldering residue removal.
Try Bottom-Side Pin Soldering
If possible, solder connector pins on the bottom side of the board rather than the top (component) side. Soldering on the bottom works with gravity to help prevent solder from wicking up the leads.

Fixing Solder Wicking Issues
If despite preventative measures, excessive solder wicking still occurs and causes issues, there are a few ways to correct it:
Solder Wick
Solder wick, also known as desoldering braid, can be used to remove excess solder from leads. Place the solder wick on the affected lead and heat it with the soldering iron. Molten solder will be drawn up into the copper braid via capillary action. Use flux if needed to promote solder transfer.
Solder Sucker
A solder sucker is a vacuum device used to remove molten solder from a joint. Heat the joint with the soldering iron, then quickly place the solder sucker nozzle over the joint and activate it to suck up the excess solder. Spring-loaded solder suckers are the most common type.
Add More Flux and Re-Flow
In some cases, applying additional flux to the joint and re-heating it can help excess solder flow back down and create a proper fillet. Use just enough heat to re-flow the solder and avoid applying the iron for too long.
Use a Hot Air Rework Station
For more delicate rework, a hot air station can be used to precisely re-flow the solder joint and coax solder down the leads. Use a fine nozzle tip and adjust the airflow and temperature as low as practical to melt the solder while avoiding component damage.
FAQ
Q: What is the best soldering iron tip for avoiding solder wicking on connector pins?
A: A fine conical or elongated tip that concentrates heat at the end works best for precise soldering of connector pins. The tip should match the size of the joint to avoid heating more of the leads than necessary.
Q: Is lead-free solder more prone to wicking than leaded solder?
A: In general, yes. Lead-free solder typically has a higher melting point and can be more sluggish to work with than leaded solder. The higher temperatures needed for lead-free soldering can promote wicking if not controlled carefully.
Q: Can you prevent solder wicking by using thicker gauge solder wire?
A: Using thicker solder wire can deposit more solder than needed and actually increase wicking. It’s better to use thin solder wire (e.g. 28-32 AWG) and apply only as much solder as needed for a proper joint. Technique is more important than solder wire gauge in controlling wicking.
Q: Will using more flux help prevent solder wicking?
A: No, using excessive flux can have the opposite effect. Too much flux can thin the solder and promote wicking via capillary action. Apply flux judiciously and avoid letting it wick up the leads before applying solder.
Q: What’s the best way to remove solder that has wicked too far up a connector lead?
A: Solder wick and a solder sucker are the most common tools for removing excess solder. Apply the solder wick and heat it with the iron to draw up the solder. Or use the solder sucker to vacuum molten solder from the heated joint. A hot air station can also be used for more precise re-flow and solder removal.


Leave a Reply